2024
Title: VT_IV
Technical workflow research with 3D naturalised open world environment (explorable) as the resulting product.
This project will be an immersive game environment built in Unreal Engine, consisting of different types of environment settings (if sufficient time). It will be a third-person graphic adventure for the players to explore through an AAA mythical game scene. This project will use high poly photogrammetry models, terrains, VDBs from VFX film, and iterate consistently from Houdini to Unreal Engine and vice versa to construct immersive naturalized open world environments.
Topic of research experimented with this project: How to stabilize and easily use high poly photogrammetry models, terrains, and simulations from VFX film and iterate consistently from Houdini to Unreal Engine and vice versa to construct immersive naturalized open world environments for increased production efficiency?
Early Concept (Photoshop) (1 week)

Location A - Main Camera A


Location C - Main Camera C
Location D - Main Camera D


Rough Bockout to Layout and Main location camera set up (MAYA & Houdini) (1 week)


Location A - Camera A


Location C - Camera C

Location D - Camera D
Set up Cameras A, B, and C to match my concept art.
Terrain Shape Block out in MAYA.
Adjust the blockout to have a real-life, natural terrain (biome) measurement ratio.
Using the concept matched blockout and create a top-down map and an island/mountain full block for export to import to Houdini.
Following with Houdini to Unreal HDA workflow + research. (Note, research only for HDANC - Houdini education version)
Houdini to Unreal Engine workflow - iterations (2-3 weeks)

Main Landscape Geometry Block Out

Geometry Block out projected onto the Basic HeightField Landscape combining as a whole


HeightField Erose - Simulation of real life erosion

HeightField Masks - Adding Details to specific areas

Scatter points generated by Houdini ‘HeightField Scatter’ packaged in HDA with connecting Houdini parameters to be adjusted and use replacement (proxy) Instancer Output in Unreal Engine (real-time).
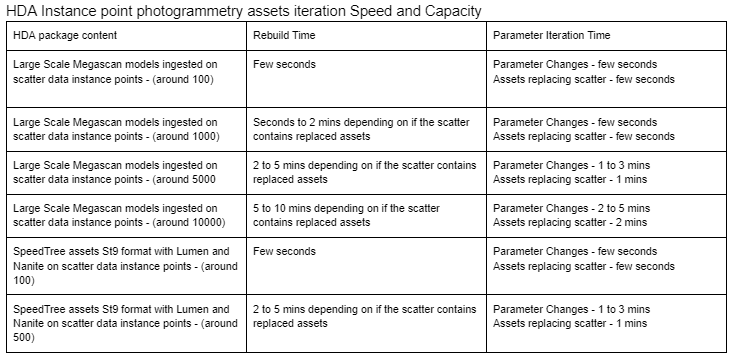
In general, research shows that the highest version that will be the best working workflow compatible and stable to translate is Unreal 5.2, Houdini 19.5.733, and SpeedTree 9.5. Using the method of separating the material and scatter data into two HDAs then setting up individual HDAs for each mass scatter point. So that the rebuild time for landscape mesh and material instance connection can make material tweaks in seconds. Scatter instance spawn and replacement of assets that takes less than minutes for each iteration would be the best option, and to do this, the HDA packaged for each mass scatter should be limited to less than 10000 points.

Manually adding details and populating the environment using Unreal Landscape paint

Camera View Setup example - making this shot look good and natural
This research focuses on stability, ease of use, and increased production efficiency for this procedural workflow to construct an immersive naturalized open world environment to discuss the best workflow and its benefits for industry production. Stability of this procedural workflow is defined as how much RAM or CPU it takes for mass photogrammetry (high polygon) assets, and if it crashes frequently in this process, as everything would be real-time. Ease of use is defined as how seamless between each software for the artists, and how easy it is to track versions across countless assets and scenes. Production efficiency is measured by the speed of iteration in each software when both opening and transferring data, with parameter adjustments in real-time, and in relation to the environment population detail.
Firstly to examine the stability on how fast each change and replacement can be made in procedural tweaks. I created a procedural terrain with Houdini and generated all of the different terrain shapes in real-time inside UE5.2. An example of this workflow starts with designing a few concepts with real world references and research on a natural, open world landscape. Then block out the main geometry of the terrain in Maya, also generate the landscape with the Houdini ‘HeightField Node’ and with ‘HeightField Project Node’ to attach the blocked out geometry onto the generated landscape. Further added ‘HeightField Distort Node’ and ‘HeightField Erode Node’ to simulate real life erosion for the landscape variations and fine details. The landscape will need to look very natural, therefore tweaks in the terrain generation is needed with masking the stretching slopes and flatten it using ‘HeightField Flatten Node’.
Once the base terrain is generated, we then create different masks for grass, water, debris, rocks etc., using ‘HeightField Mask by Feature Node’. This allows adjustments in the masks by ways like ‘Mask by Slope’, ‘Mask by Height’ and so on. All these Nodes have parameters that can be bridged to iterate in Unreal Engine after packaging the Houdini data in HDA. Naming these masks is key, as it’s named by ‘HeightField Copy Layer Node’, it allows naming for the landscape materials to be recognised directly by the UE5 landscape system. To connect with UE5’s instance material, I created ‘Attribute Create node’ and modified the Class and Type to ‘Primitive’ and ‘String’ by adding the UE5 instance material path. Similarly, scatter on the terrain can be created in the same structure. By using ‘HeightField Scatter Node’ on the masks created, it allows instancing point data to be generated. Which can be used for position (pivot data) to where we want foliage or vegetation to spawn in UE real-time. The ‘Copy to Points Node’ allows us to use either assets or simple geo as proxies to swap with photogrammetry models in Unreal. Parameters in the ‘HeightField Scatter Node’ can also be attached to the HDA for iterations in UE5 in real-time.

Scatter points instanced on the terrain landscape, indicated with box geometry on the instanced points. Different size and color are used to show scatter on various different masks for different vegetation.

Node to link UE material instance to Houdini. Also shows the end output point for the HDA created.

Terrain with seperated material layers in different mask, ready for link to UE auto-landscape material.
HeightField - Basic Landscape shapes and height

Megascans photogrammetry assets with custom dynamic materials replaced the boxes in the Instancer Output, and shows the adjustments in Unreal Engine (real-time).

Houdini masked layers are connected to the Unreal Auto-landscape Material Instance for applying and tweaking different textures, materials and allow adjustments in Unreal Engine (real-time) using the Unreal Landscape tool to paint additional layers.


Final result after using the procedural workflow (Everything in this image is done procedurally)
Remove the procedural look - Add detail and bring realism (2-3 weeks)
Map out the main exploration area, and set up still cameras to dress up the environment for each camera shot. (I’ve set up around 20 camera)
Then use the Unreal Landscape Paint to manually add, adjust, or paint on the foliage materials and vegetation module assets. This overlay of adjustments allows more detailed tweaks to a specific point of the environment, with the setup up camera shot views for position reference. Most of the assets are taken from Megascans, bought from UE store, but some are personally created (in SpeedTree, Maya) for a better fit with the biomes and my vision.
To create a more natural and realistic look, texture materials were custom-written, primarily dynamic materials to control environmental FX (motion).
A few Niagara FX, such as mist, fog, dust, falling leaves, and other smaller-scale environment FX are created for this project.
A water material that reacts with the sun's light direction, and the position the player views the water is created to simulate real-life water reaction.
To lower the real-time rendering cost, I’ve used Nanite for all the assets, limited the texture resolution, and world partition set up for the landscape. An improved texture streaming is also looked into.
Final touches with lighting adjustments, post-process material, and other shading options.